![]()
How to create a caption file for YouTube or Amara using Otter.ai
- You
can import your video files or record your voice, and as you speak it
will create the caption file for your audio. With these files, you can
then upload them into the YouTube editor, or, if it is a non-owned
video, you can upload the captions into Amara.
The SRT files have timestamps and will automatically sync the captions
to the video. This tool is much faster than having to manually caption a
video from scratch! You can edit the captions with any corrections
that need to be made to the spelling in Otter.ai! Otter.ai is pretty
good about adding in punctuation. Otter.ai will require the least
editing.
- Steps: Create caption file in Otter.ai, upload to your YouTube video, or upload to Amara for non-owned video.
- Turn around time: Check out temporary license from Distance Education and start right away!
- Caption accuracy: Most accurate with good punctuation, limited editing needed for misspelled words
- Suggested Usage: Your own longer videos or non-owned videos
Important note: Contact Distance Education to use a SAC Otter.ia Pro account. A Pro, paid version, of Otter.ai is needed to have the export options available to create a caption file.
Recording
The first step is to get the transcript created in otter. This can be done by either creating a new recording or importing audio and video.
- Recording can be done in the web browser or using the mobile app.
- Select Start Recording to begin recording audio.
![]()

Importing
- A transcript can be created with multiple speakers for audio or video that has been imported.
- Multiple files can be transcribed simultaneously.
The file will need to be processed by otter.ai after being recorded or imported. Check the My Conversations tab in a few minutes to review the file.
Importing Non-Owned Videos
Since the import method can only work with video files that you have on your computer, for any video on Youtube that you'd like to caption, you will have to download it first.
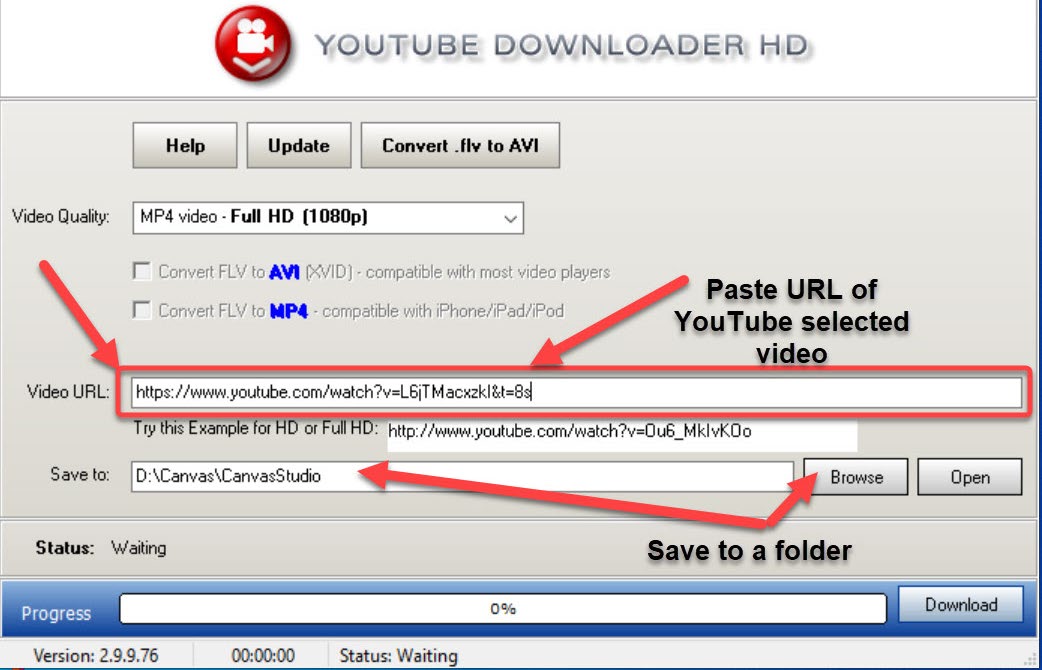
Search with Google for a free YouTube downloading software such as "Youtube Downloader HD" and install it in your computer.

Open Youtube Downloader and paste the URL of the selected YouTube Video that you'd like to caption. Choose MP4 video Full HD (1080) from the Video Quality drop-down menu. Note: Some YouTube videos may be of a lower quality such as 480 pixels wide and will not download at the desired 1080 HD quality. In those situations, choose the largest pixel size available. Browse and select a folder in your computer to save this video and click "Download".
Once the video file has been downloaded onto your computer, you can proceed with the same import steps into Otter.ai!
Editing a conversation
Edit your Conversation in otter.ai to ensure accuracy and maintain captioning best practices.
- Conversations will be time stamped, speakers will be identified, and the audio can be played back in the edit mode.
- Transcripts can be edited for accuracy, add new speakers, search via keyword.
Exporting to SRT File
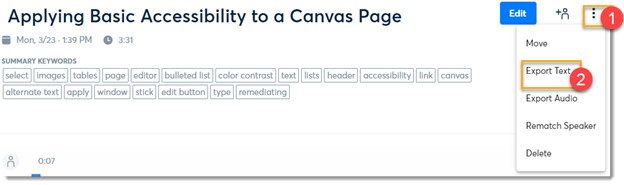
Select three dots on an individual conversation and select Export Text.
![]()
- Export text as SRT or other file types
- Ensure Max characters per line is set to 32 and max number of lines I set to 2.
Upload SRT File to YouTube
The exported file will be in your computer downloads. The next step is to upload this edited file into your YouTube account.
Step 1
Sign into YouTube
Step 2
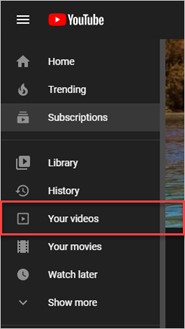
Select your videos
![]()
This can also be accomplished through YouTube studio.
![]()

Step 3
Select the video that you want to upload a caption file for.
Step 4
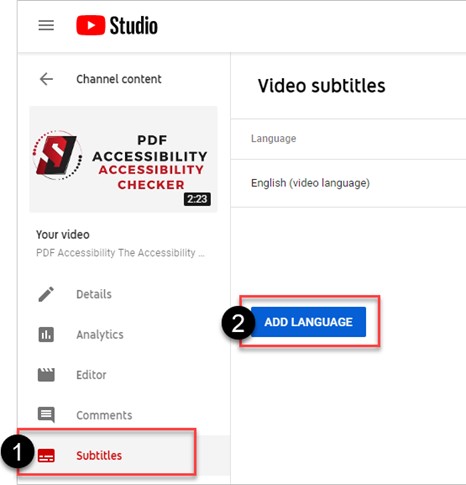
Select Subtitles and add Language.
![]()
Step 5
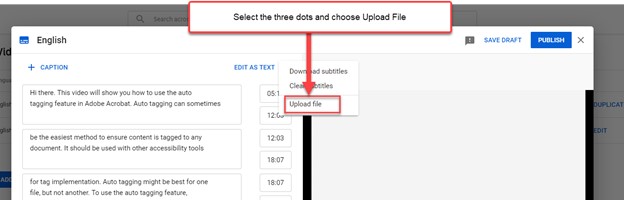
Select upload. This option is in several areas of the page.
![]()
Step 6
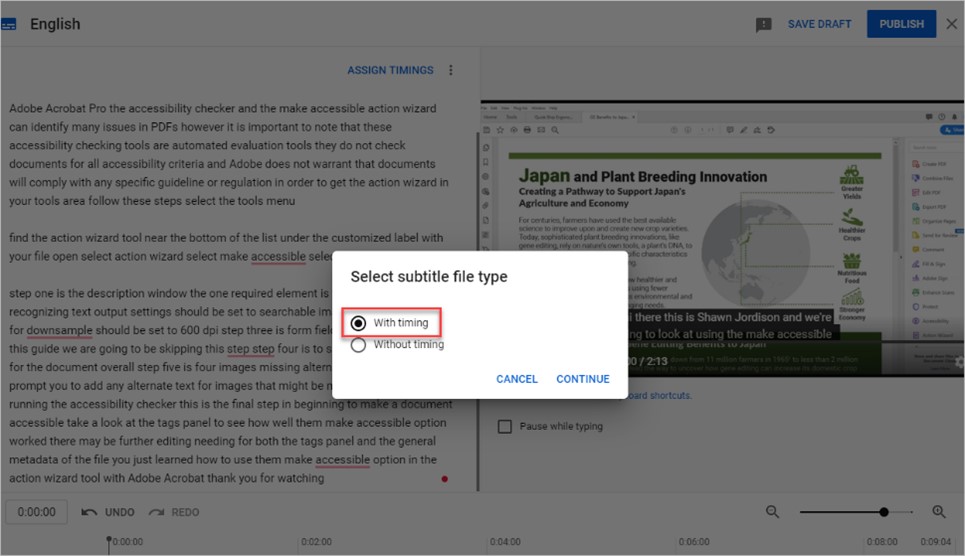
Select the language of the transcripts and upload the file. SRT files will have With Timing for an option.
![]()
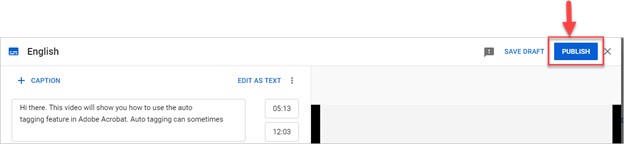
Step 7
Select Publish
![]()
Or, if you are using a 3rd party video, you can upload to Amara for captioning!