NOTIFICATION SETTINGS
Canvas Notification Settings control how and when Canvas notifies users. Notification Settings can be customized, either to all courses or individual courses. To access the Notification Settings, click the Account link on the Global Navigation Menu, and select Notification from the menu. Click the notification option to select for each item.

ANNOUNCEMENTS
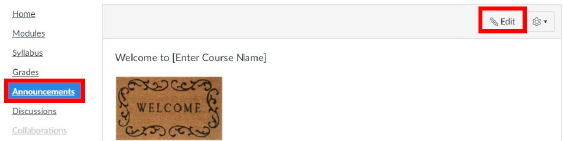
Announcements allow faculty to broadcast information to the entire class at once. The three most recent announcements will display at the top of the home page. To access, click the Announcements link on the Course Navigation Menu. To edit an announcement, click on the announcement to access it, then click the Edit button on the top right of the page. There is an option to Delay Posting, which will not release and notify students of the announcement until the specified date.
DISCUSSIONS
Discussions allow asynchronous communication between course participants. Discussions in Canvas can be classified as Pinned (always at the top), Discussion (open discussions), and Closed for Comments (manually closed or past the available until date). Discussions that are Closed for Comments are still available to students in a read-only format. To access, click the Discussions link on the Course Navigation Menu. To add a new Discussion, click the + Discussion button at the top of the page. To access an existing Discussion, click on the title. Click the Edit button at the top right to edit an existing Discussion. To reorder drag and drop the Discussion to the desired location.

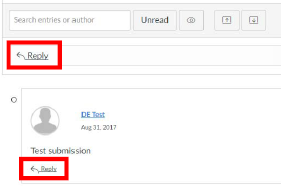
To post to a Discussion, click to access. Click the Reply field beneath the prompt and type the post in the provided text box. To reply to another post, click the Reply link directly beneath the post to be replied to.
(CONVERSATION) MESSAGES
Conversation Messages are the messaging tool in Canvas. While the Messages are not Email, and are stored in Canvas, a Notification Preference can be set to push Messages to an Email. Messages can be replied to directly from the Notification Email.
 Conversations can be accessed by clicking the Inbox icon on the Global Navigation Menu. Conversations are managed in the Inbox, where users can create, replay and manage the messages.

The Inbox has options to display all courses or a specific course, and / or by status (Inbox, Unread, Starred, Sent, Archived, Submission Comments). On the right of the toolbar, there are icons to Compose a new message, Reply, Reply All, Archive, Delete and Settings. There is a search field for the address book to the far right and an address book icon. Message are “threaded” and displayed in a conversation format, meaning that related messages are displayed together in a string.
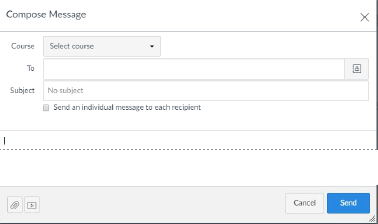
To create a new message, click the Compose button. Use the pulldown to select the course, then select the recipient(s). Enter a subject. Click the Send an individual message to each recipient checkbox to select. This will add recipient(s) as bcc’s so that recipients will not see the names of others receiving the message. Enter the text in the provide box.
Attachments and media can be added using the icons at the bottom. Click the Send button to send the message.
Tips: To help keep the Inbox organized and manageable, Archive messages once they have been read and responded to. This will ensure that only new or messages that need attention are displayed in the Inbox. Archived messages can be accessed at any time using the “Inbox” drop down, and selecting Archived from the menu.